Build a Static Webpage Using Terraform Tool
Today I am going to explain How to deploy your Static webpage using a terraform tool. Using a single click you will be able to deploy your webpage.
 |
| Integration of aws with terraform |
First, I would like to thank #vimaldaga and his #team to support us.
Our First Task is:
1. Create the key and security group which allows the port 80.
2. Launch EC2 instance.
3. In this Ec2 instance use the key and security group which we have created in step 1.
4. Launch one Volume (EBS) and mount that volume into /var/www/html
5. The developer has uploaded the code into Github repo also the repo has some images.
6. Copy the GitHub repo code into /var/www/html
7. Create S3 bucket, and copy/deploy the images from Github repo into the s3 bucket and change the permission to public readable.
8 Create a CloudFront using s3 bucket(which contains images) and use the CloudFront URL to update in code in /var/www/html
A solution of Task 1
Step-1) We have to create a key so that any other user can access that particular instance.
Command to create a key: ssh-keygen -f keyname (Run this command on CMD)
After running this command you will see your system has downloaded two files, one file contains the public key and the second file contain a private key.
 |
| Public and Private Key |
By default, the extension of the key is .pem file
These keys will help you to access the Instance.
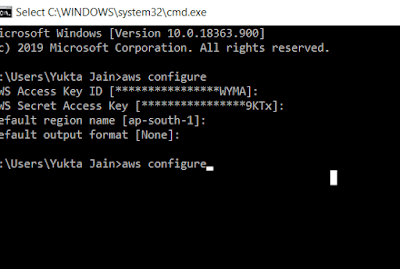
Step 2) type -> aws configure in cmd prompt so that you can enter the Access key and Private key
 |
| AWS Configure Command |
Step 3) Create a folder in any drive suppose Drive D: then create a directory(example Terra) then open cmd prompt in the folder and create a notepad file with an extension of .tf (example hello.tf)
 |
| Terra Folder Creation |
Command to create hello.tf -> notepad hello.tf
 |
| hello.tf file creation |
Step-4) Now write terraform command in the notepad
A) Below screenshot helps you to understand easily,
first, we choose aws provider, in that provider we choose the region and profile name.
Secondly, we create a key_pair dynamically so that the user can create their own key.
 |
| AWS Provider |
B) Now we are going to launch aws-instance
 |
| AWS Instance Launching |
 |
| The output of Instance Creation |
C) Now our plan is to deploy a PHP file in /var/www/html file inside the ec2-instance. So we are going to install git,httpd software, and restart the service and enable the service.
For running the above command we need a provisioner who has to run the command inside the ec2-user from the outside world.
 |
| Remote-exec Provisioner |
D) Now we want to add the ebs volume so that our data stores permanent. After adding ebs volume we are going to attach that volume to the ec2- instance.
 |
| Adding EBS volume and Attaching EBS Volume to ec2-instance |
E) With the help of output command, we can print out output to the cmd
 |
| Output Command |
F) Now we are going to add the rules so that our ec2-instance allows the incoming traffic from anywhere through HTTP protocol, so we are adding HTTP protocol rule.
 |
| Adding Http Protocol Rule |
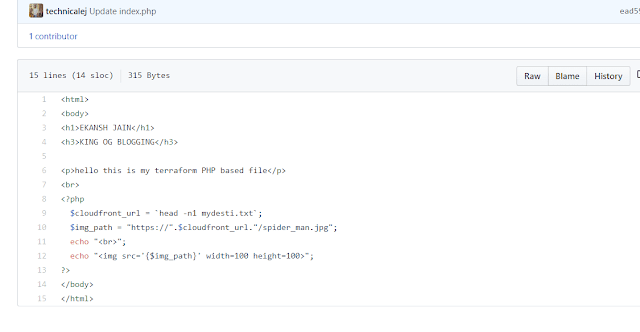
G) Now we are going to import a PHP file from GitHub to /var/www/html folder.
 |
| Import php file to /html folder |
 |
| Github Code |
a) First, we need to format our ebs-volume, command -> sudo mkfs.ext4 /dev/xvdh.
b) then mount the ebs-volume to HTML folder, command -> "sudo mount /dev/xvdh /var/www/html"
c) Now we are importing a PHP file and paste the CloudFront distribution domain name then restart the service.
Note: CloudFront distribution domain name explains further.
H) Creating s3 Bucket.
 |
| Creation of S3 Bucket |
 |
| The output image is uploaded |
I) Creating a S3 bucket object so that image can upload from GitHub and store.
 |
| Creation of S3 Bucket Object |
J) Creating CloudFront distribution, we are creating CloudFront distribution so that latency can be decreased and the client will get the data fastly through the edge location.
 |
| Creation of CloudFront distribution(Part-1) Creation of CloudFront distribution(Part-2) |
 |
| CloudFront Distribution Created |
K) Now all setting has done now we are ready to see out PHP page
 |
| Launching a static Webpage using local-exec provisioner |
This is the last command of .tf file this command will help you to open the chrome browser and paste the IP address of the instance and then you will be able to your PHP file
Step-5) Type terraform init in cmd prompt, then type terraform apply -auto-approve, it will take some time approx (5-10 minutes) to deploy your entire webpage on the ec2-instance
 |
| Webpage Created |
Hurray !!
Thanks, #vimaldaga to teach us.
#multicloud #hybridcloud #cloudcomputing #latesttechnology
Github Link --> GitHub Code (index.php + hello.tf file)


No comments:
Post a Comment
If you have any doubts, Please Comment down